GtSdkDemoDemo工程。使用Xcode15的开发者请注意:
由于Xcode15在target<12下会存在Network.framework Crash问题。
解决方案一:用户需要升级使用GTSDK 3.0.5.0+ 和 GTCommonSDK 3.1.0.0+, SDK新增在Info.plist中添加GT_MinimumOSVersion字段,填写当前app的target值。对应的通知扩展的Info.plist也需要同样的修改。
解决方案二:修改target>=12。 苹果官网明确Xcode15最低支持iOS12+。
[GeTuiSdk registerRemoteNotification:]接口,用于开启远程通知权限。需要在GeTuiSdk startSdkWithAppId启动SDK之后执行。GeTuiSdkNotificationCenter: willPresentNotification: completionHandler:,用于展示APNs通知。GeTuiSdkDidReceiveNotification: notificationCenter: response: fetchCompletionHandler:,用于接收APNs通知。GeTuiSdkDidReceiveSlience: fromGetui: offLine: appId: taskId: msgId: fetchCompletionHandler:,用于接收个推透传消息。GeTuiSdkNotificationCenter: openSettingsForNotification:,用于APNs通知设置跳转。[GeTuiSdk registerDeviceToken:],开发者需要移除application:didRegisterForRemoteNotificationsWithDeviceToken中的[GeTuiSdk registerDeviceTokenData:], 因为个推在[GeTuiSdk registerRemoteNotification:]方法内部自动关联苹果 device token 和 个推 clientid。[GeTuiSdk registerDeviceTokenData:]。应用配置,获取到相应的AppID、AppKey、AppSecret信息。使用时需要新建一个名为 Podfile 的文件,如下格式,将依赖的库名字依次列在文件中即可:
target 'GtSdkDemo-objc' do
    platform :ios, "8.0"
    pod 'GTSDK'
end

target 'NotificationService' do
    platform: ios, "10.0"
    pod 'GTExtensionSDK'
end
#个推3.0.0.0及以上版本
target 'GtSdkDemo-objc' do
    platform: ios, "8.0"
    pod 'GTSDK'
    pod 'GTCommonSDK', 'xxxx-noidfa' #xxxx代表当前最新版本号
end

#个推3.0.0.0以下版本
target 'GtSdkDemo-objc' do
    platform: ios, "8.0"
    pod 'GTSDK', 'xxxx-noidfa' #xxxx代表当前最新版本号
end

target 'NotificationService' do
    platform :ios, "10.0"
    pod 'GTExtensionSDK'
end
注意事项:
1.pod 'GTSDK' 为添加在主 target 上, pod 'GTExtensionSDK' 为添加在 NotificationService Target 上。
2.在 App 内无广告情况下还是建议开发者使用获取 IDFA 版本,并参考【IDFA版SDK注意事项说明】中所说的方式提交 AppStore 审核。当然,如果开发者不想使用 IDFA 或者担忧采集 IDFA 而未集成任何广告服务遭到 Apple 拒绝,我们也准备了该无 IDFA 版本供开发者集成。
3.pod 'GTExtensionSDK' 库需提前添加 Notification Service Extension, 添加方式参考【7. iOS 多媒体及展示统计】。
4.若不集成处理'GTExtensionSDK',则会严重影响后续苹果APNs通道的数据统计,影响到达率。
$ cd "<path/to/project>"
$ pod install
注意事项:
1.如果出现错误 :【Unable to find a target named 'NotificationService', did find 'cocoapods'】,为工程中未添加 Notification Service Extension 导致,需手动添加 NotificationService,添加方式参考【7. iOS 多媒体及展示统计】。
现在,我们也可以直接使用 Swift Package Manager 来管理依赖包。打开工程,选择菜单栏中的File > Add Packages...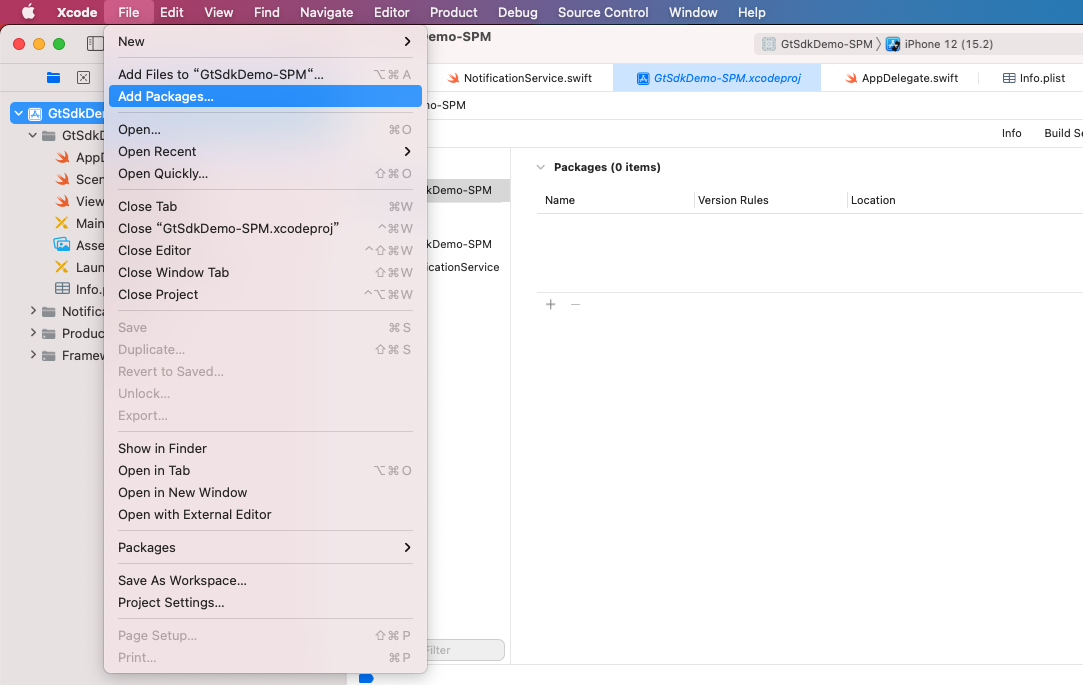
在搜索框中输入Github上GTSDK的仓库地址:git@github.com:GetuiLaboratory/getui-sdk-ios-cocoapods.git进行查找。
在搜索框中输入Github上GTCommonSDK的仓库地址:git@github.com:GetuiLaboratory/getui-gtcsdk-ios-cocoapods.git进行查找。
找到仓库之后,修改Dependency Rule为Branch=master, 点击Add Package。
选择对应的Target项目后,点击Add Package,完成集成。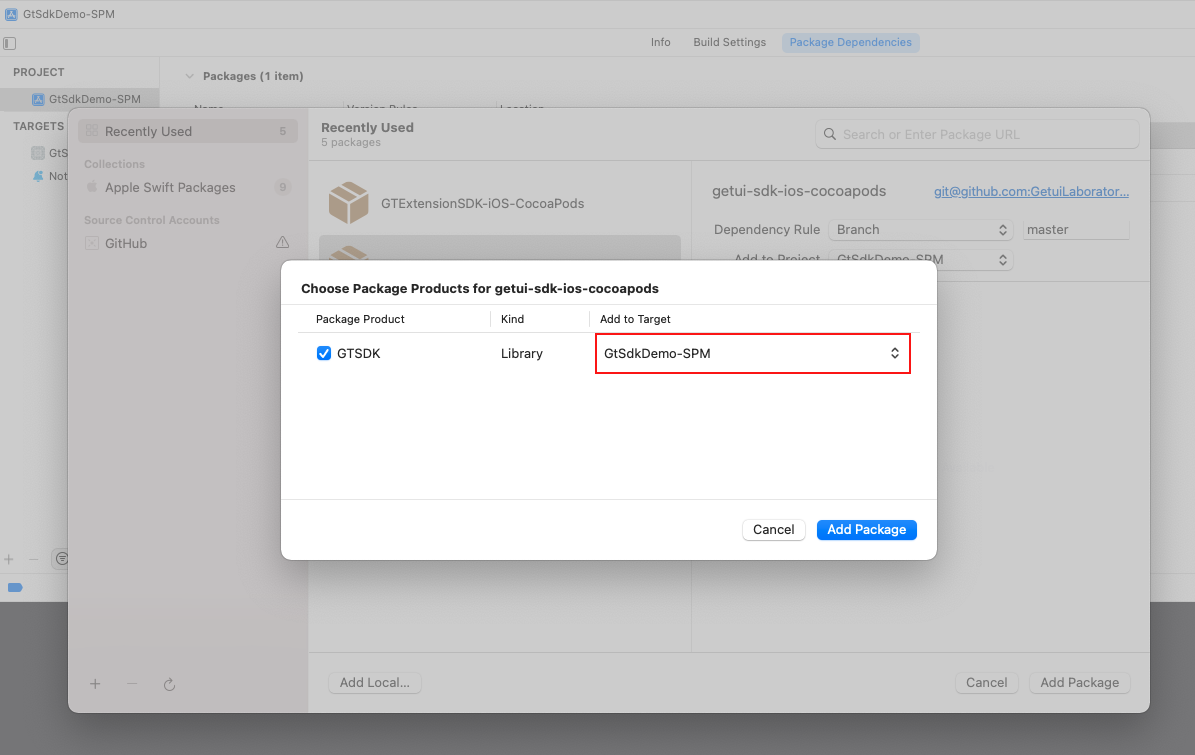
由于GTSDK需要依赖GTCommonSDK,开发者还需要添加GTCommonSDK依赖包,仓库地址:git@github.com:GetuiLaboratory/getui-gtcsdk-ios-cocoapods.git, 分支main
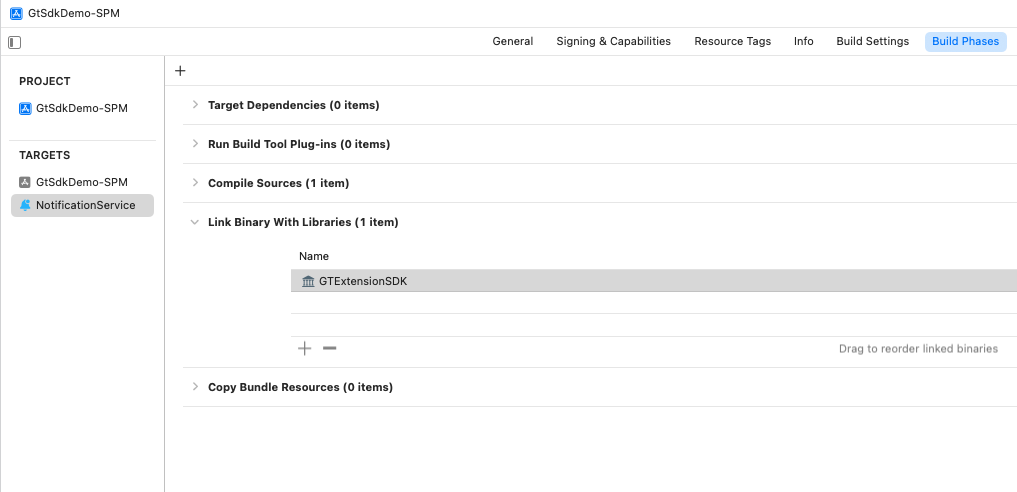
通知扩展依赖包GTExtensionSDK,仓库地址:git@github.com:GetuiLaboratory/GTExtensionSDK-iOS-CocoaPods.git, 分支master。
依赖包添加完成后,选择对应target,Build Phases > Link Binary With Libraries, 检查一下依赖包。集成完成。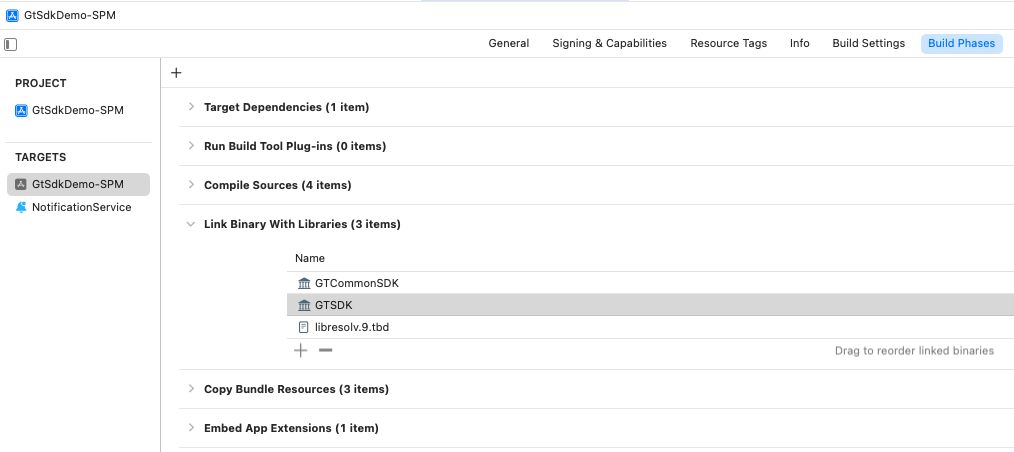
GETUI_IOS_SDK/
  |- readme.txt (SDK资料包说明)
  |- Lib/
  |    |- GtSdkLib/ (标准版个推SDK.xcframework文件)
  |    |   |- GTExtensionSDK.xcframework
  |    |   |- GTSDK.xcframework
  |    |   |- GTCommonSDK.xcframework  (个推SDK 3.0.0.0及以上版本提供)
  |    |- GtSdkLib-noidfa/ (无IDFA版个推SDK.xcframework文件)
  |    |   |- GTExtensionSDK.xcframework
  |    |   |- GTSDK.xcframework
  |    |   |- GTCommonSDK.xcframework  (个推SDK 3.0.0.0及以上版本提供)
  | - Demo/
  |    |- GtSdkDemo-Manual/ (Objective-C手动集成演示Demo工程)
  |    |- GtSdkDemo-Pods/ (Objective-C CocoaPods集成演示Demo工程)
  |    |- GtSdkDemo-Swift/ (Swift标准集成框架代码工程)
  |    |- GtSdkDemo-SwiftUI/ (SwiftUI标准集成框架代码工程)
  |    |- GtSdkLib/ (个推SDK库文件,供上述Demo工程引用)
使用标准版本SDK需添加 AdSupport.framework 库支持
GtSdkLib-noidfa:无IDFA版个推SDK,包含集成所需的静态库和头文件。
在 App 内无广告情况下还是建议开发者使用获取 IDFA 版本,并参考【IDFA版SDK注意事项说明】中所说的方式提交 AppStore 审核。当然,如果开发者不想使用 IDFA 或者担忧采集 IDFA 而未集成任何广告服务遭到 Apple 拒绝,我们也准备了该无 IDFA 版本供开发者集成。
使用无 IDFA 版本SDK需删除 AdSupport.framework 库支持
GTSDK.xcframework:个推SDK核心库文件,支持i386、x86_64、arm64、armv7,因此同时支持simulator和device设备。
GTCommonSDK.xcframework:个推基础库,为个推SDK提供基础依赖。
个推SDK 3.0.0.0 及以上版本主包需要导入GTCommonSDK 3.0.3.0 以上版本;个推SDK 3.0.0.0 以下版本无需导入
GtSdkDemo-Manual工程,将GTSDK.xcframework添加到项目工程目录下: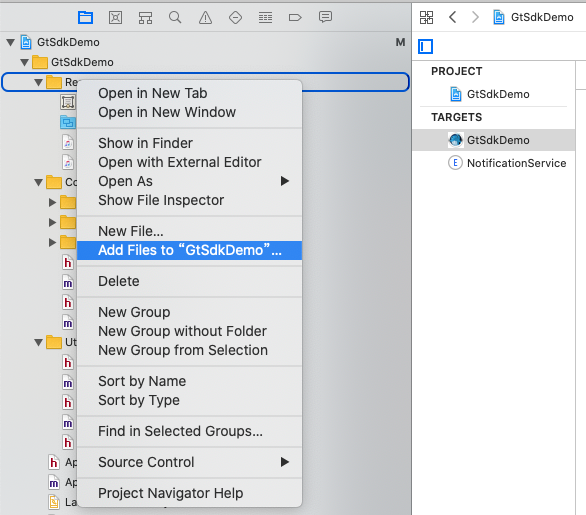
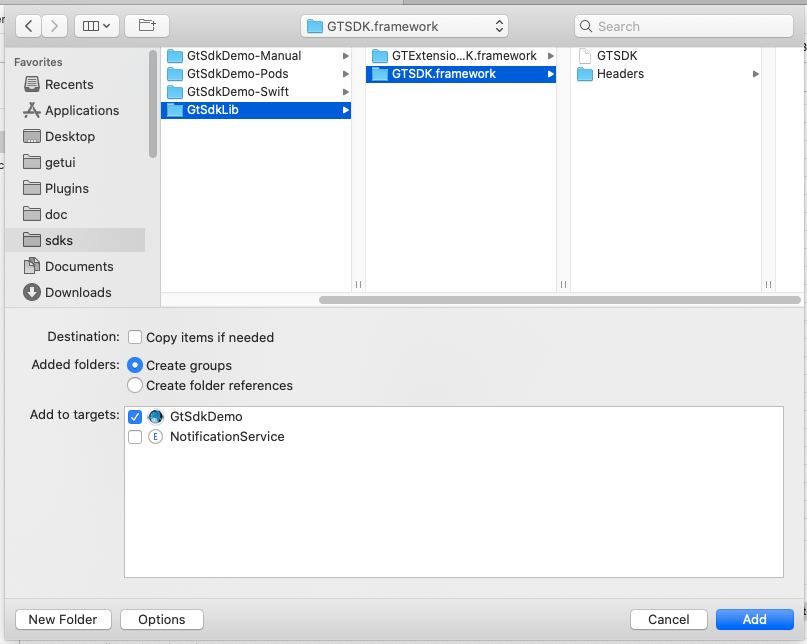

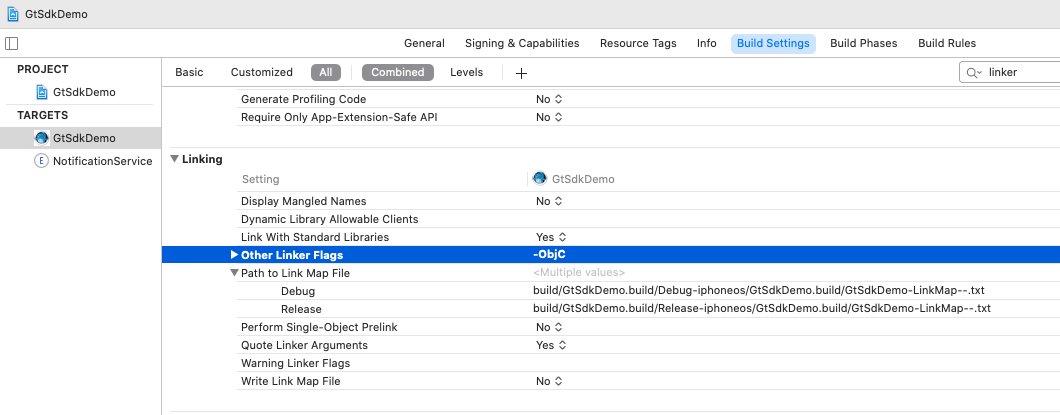
老版本升级到 1.6.2.0 及以上版本注意事项:
1、不再需要 JavaScriptCore.framework 使用。
2、不再需要 CoreBluetooth.framework 使用。
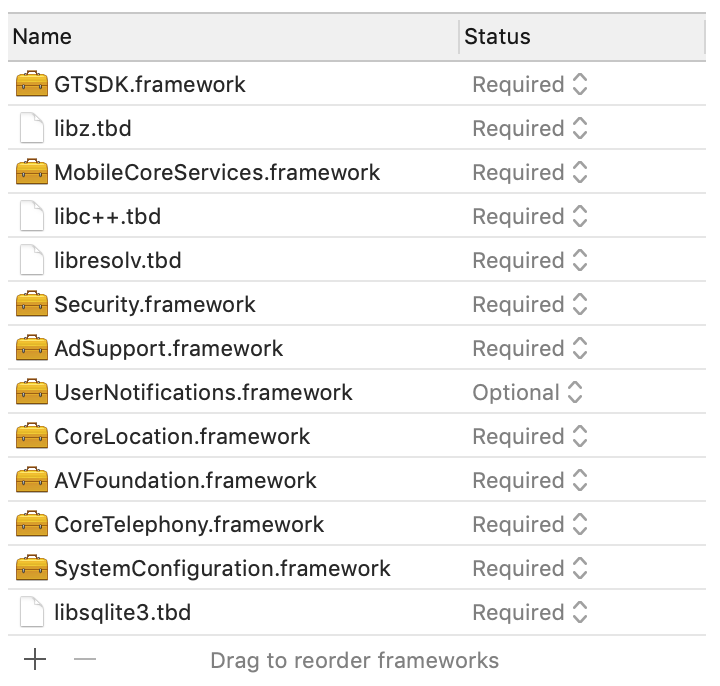
3、添加 UserNotifications.framework 库并使用 Optional 方式引用,需要使用 Xcode 8 及以上版本编译。
升级或者集成 2.3.1.0及以上版本注意事项:
1、2.3.1.0 版本需要添加 libresolv.tbd 库。
libc++.tbd
libz.tbd
libsqlite3.tbd
libresolv.tbd
Security.framework
MobileCoreServices.framework
SystemConfiguration.framework
CoreTelephony.framework
AVFoundation.framework
CoreLocation.framework
UserNotifications.framework (iOS 10 及以上需添加,使用 Optional 方式接入)
AdSupport.framework   (如果使用无IDFA版本SDK,则无需添加该 AdSupport 库)
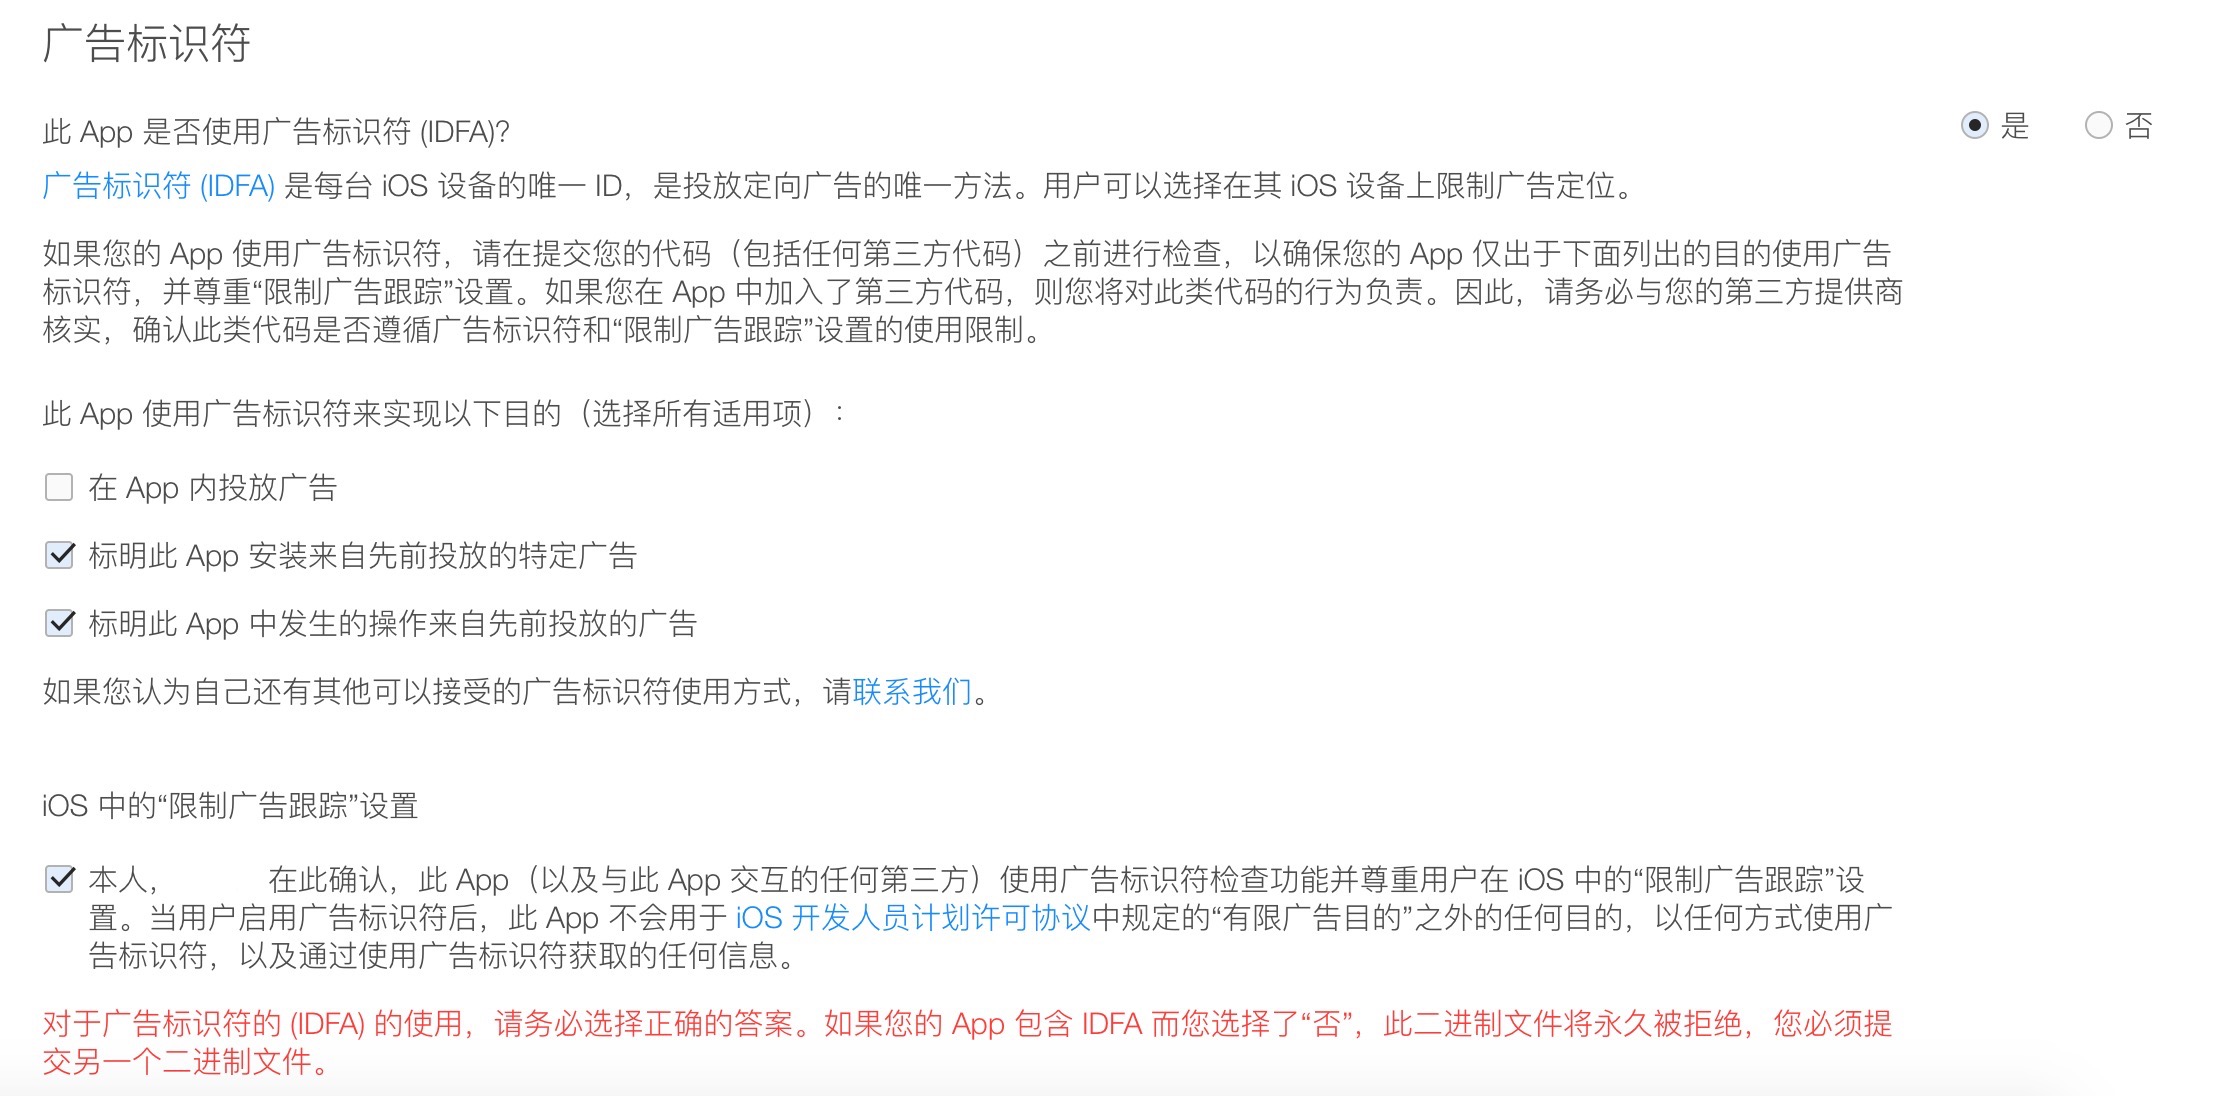
在 App 内无广告情况下还是建议开发者使用获取 IDFA 版本,可参考下图中所说的方式提交 AppStore 审核。当然,如果开发者不想使用 IDFA 或者担忧采集 IDFA 而未集成任何广告服务遭到 Apple 拒绝,我们也准备了该无 IDFA 版本供开发者集成。
注意事项:
(1)、在 App 内投放广告,获取 IDFA 可通过苹果审核。
(2)、App 内无广告,但由于先前投放的特定广告,可参考如下勾选,通过苹果审核。
需勾选如图:
Target设置中的Signing & Capabilities,点击左上角+添加。如果没有开启该开关,应用将获取不到DeviceToken: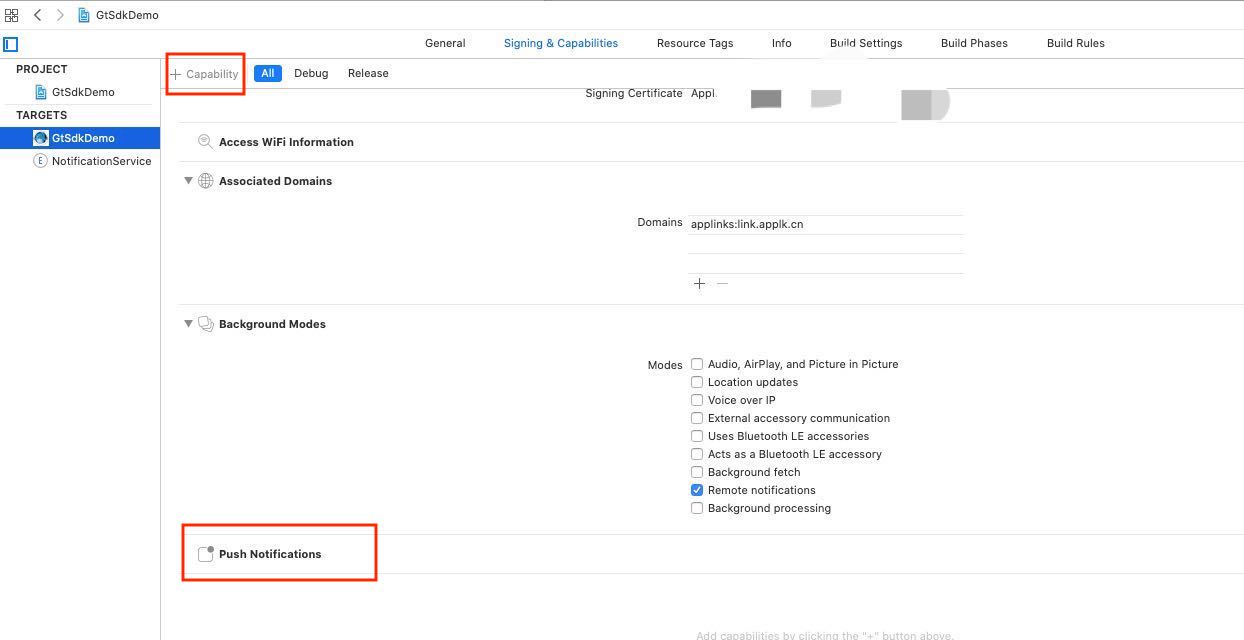
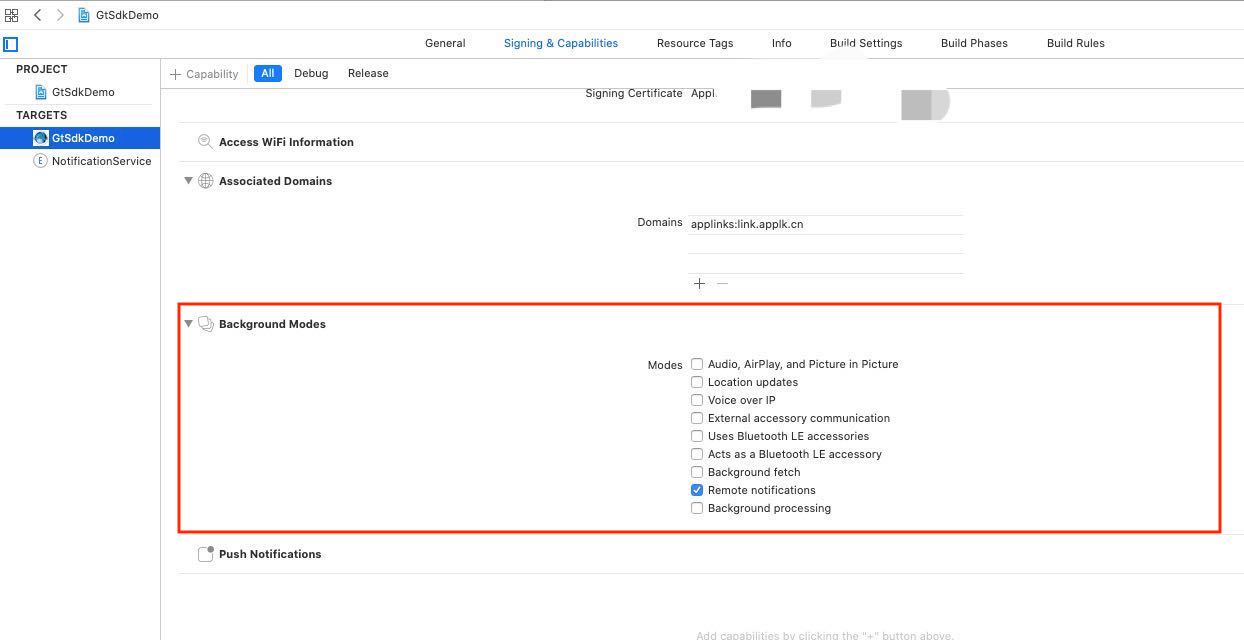
Remote notifications:APNs静默推送权限
AppDelegate增加回调接口类。示例代码如下:// AppDelegate.h
#import <UIKit/UIKit.h>
#import <GTSDK/GeTuiSdk.h> // GetuiSdk头文件
@interface AppDelegate : UIResponder <UIApplicationDelegate, GeTuiSdkDelegate>
实现个推回调接口,示例代码如下:
/// 通知展示(iOS10及以上版本)
/// @param center center
/// @param notification notification
/// @param completionHandler completionHandler
- (void)GeTuiSdkNotificationCenter:(UNUserNotificationCenter *)center willPresentNotification:(UNNotification *)notification completionHandler:(void (^)(UNNotificationPresentationOptions))completionHandler {
    NSString *msg = [NSString stringWithFormat:@"[ TestDemo ] [APNs] %@ \n%@", NSStringFromSelector(_cmd), notification.request.content.userInfo];
    [self.homePage logMsg:msg];
    // [ 参考代码,开发者注意根据实际需求自行修改 ] 根据APP需要,判断是否要提示用户Badge、Sound、Alert等
    //completionHandler(UNNotificationPresentationOptionNone); 若不显示通知,则无法点击通知
    completionHandler(UNNotificationPresentationOptionBadge | UNNotificationPresentationOptionSound | UNNotificationPresentationOptionAlert);
}

/// 收到通知信息
/// @param userInfo apns通知内容
/// @param center UNUserNotificationCenter(iOS10及以上版本)
/// @param response UNNotificationResponse(iOS10及以上版本)
/// @param completionHandler 用来在后台状态下进行操作(iOS10以下版本)
- (void)GeTuiSdkDidReceiveNotification:(NSDictionary *)userInfo notificationCenter:(UNUserNotificationCenter *)center response:(UNNotificationResponse *)response fetchCompletionHandler:(void (^)(UIBackgroundFetchResult))completionHandler {
    NSString *msg = [NSString stringWithFormat:@"[ TestDemo ] [APNs] %@ \n%@", NSStringFromSelector(_cmd), userInfo];
    [self.homePage logMsg:msg];
    if(completionHandler) {
        // [ 参考代码,开发者注意根据实际需求自行修改 ] 根据APP需要自行修改参数值
        completionHandler(UIBackgroundFetchResultNoData);
    }
}


/// 收到透传消息
/// @param userInfo    推送消息内容
/// @param fromGetui   YES: 个推通道  NO:苹果apns通道
/// @param offLine     是否是离线消息,YES.是离线消息
/// @param appId       应用的appId
/// @param taskId      推送消息的任务id
/// @param msgId       推送消息的messageid
/// @param completionHandler 用来在后台状态下进行操作(通过苹果apns通道的消息 才有此参数值)
- (void)GeTuiSdkDidReceiveSlience:(NSDictionary *)userInfo fromGetui:(BOOL)fromGetui offLine:(BOOL)offLine appId:(NSString *)appId taskId:(NSString *)taskId msgId:(NSString *)msgId fetchCompletionHandler:(void (^)(UIBackgroundFetchResult))completionHandler {
    // [ GTSDK ]:汇报个推自定义事件(反馈透传消息),开发者可以根据项目需要决定是否使用, 非必须
    // [GeTuiSdk sendFeedbackMessage:90001 andTaskId:taskId andMsgId:msgId];
    NSString *msg = [NSString stringWithFormat:@"[ TestDemo ] [APN] %@ \nReceive Slience: fromGetui:%@ appId:%@ offLine:%@ taskId:%@ msgId:%@ userInfo:%@ ", NSStringFromSelector(_cmd), fromGetui ? @"个推消息" : @"APNs消息", appId, offLine ? @"离线" : @"在线", taskId, msgId, userInfo];
    [self.homePage logMsg:msg];

    if(completionHandler) {
        // [ 参考代码,开发者注意根据实际需求自行修改 ] 根据APP需要自行修改参数值
        completionHandler(UIBackgroundFetchResultNoData);
    }
}

- (void)GeTuiSdkNotificationCenter:(UNUserNotificationCenter *)center openSettingsForNotification:(UNNotification *)notification {
    // [ 参考代码,开发者注意根据实际需求自行修改 ] 根据APP需要自行修改参数值
}


- (void)GeTuiSdkDidOccurError:(NSError *)error {
    NSString *msg = [NSString stringWithFormat:@"[ TestDemo ] [GeTuiSdk GeTuiSdkDidOccurError]:%@\n\n",error.localizedDescription];

    // SDK发生错误时,回调异常错误信息
    NSLog(@"%@", msg);
}
[AppDelegate didFinishLaunchingWithOptions]方法中调用个推sdk初始化方法,传入个推平台分配的 AppID、AppKey、AppSecret。同时,调用APNs注册方法,尝试获取APNs DeviceToken。示例代码如下:/// 个推开发者网站中申请App时,注册的AppId、AppKey、AppSecret
#define kGtAppId @"iMahVVxurw6BNr7XSn9EF2"
#define kGtAppKey @"yIPfqwq6OMAPp6dkqgLpG5"
#define kGtAppSecret @"G0aBqAD6t79JfzTB6Z5lo5"
- (BOOL)application:(UIApplication *)application didFinishLaunchingWithOptions:(NSDictionary *)launchOptions {
// 通过个推平台分配的appId、 appKey 、appSecret 启动SDK,注:该方法需要在主线程中调用
[GeTuiSdk startSdkWithAppId:kGtAppId appKey:kGtAppKey appSecret:kGtAppSecret delegate:self launchingOptions:launchOptions];
// 注册远程通知
[GeTuiSdk registerRemoteNotification: (UNAuthorizationOptionSound | UNAuthorizationOptionAlert | UNAuthorizationOptionBadge)];
return YES;
}
[GeTuiSdkDelegate GeTuiSdkDidRegisterClient:]回调方法中获取注册成功的ClientID(即CID):/** SDK启动成功返回cid */
- (void)GeTuiSdkDidRegisterClient:(NSString *)clientId {
//个推SDK已注册,返回clientId
NSLog(@"\n>>>[GeTuiSdk RegisterClient]:%@\n\n", clientId);
}
Notification Service Extension机制,可在消息送达时进行业务处理。为精确统计消息送达率,在集成个推SDK时,可以添加 Notification Service Extension,并在 Extensions 中添加 GtExtensionSdk 的统计接口,实现消息展示回执统计功能。注意:1.APNs 多媒体推送功能已经全平台支持,可以通过个推开发者平台进行下发或者 API 进行推送。2. 通知扩展SDK资源包点击前往下载SDK。
File -> New -> Target -> Notification Service Extension: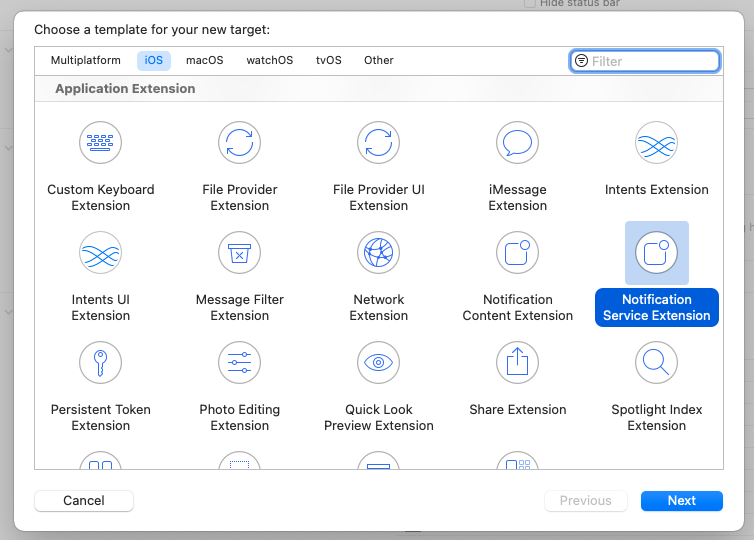
填写Target信息时需要注意以下两点:
因此我们建议使用<Main Target Bundle ID>.NotificationService格式作为Extension的BundleID。
Finish按钮后会弹出是否激活该 Target 对应 scheme 的选项框,选择 Activate,如果没有弹出该选项框,需要自行添加相应的 scheme。如下图:
NotificationService.h 和 NotificationService.m 两个类,包含以下两个方法:didReceiveNotificationRequest:(UNNotificationRequest *)request withContentHandler:(void (^)(UNNotificationContent *contentToDeliver))contentHandler
contentHandler方法结束这次处理。但是如果处理时间过长,将会进入serviceExtensionTimeWillExpire方法进行最后的紧急处理。- (void)serviceExtensionTimeWillExpire {
// Called just before the extension will be terminated by the system.
// Use this as an opportunity to deliver your "best attempt" at modified content, otherwise the original push payload will be used.
self.contentHandler(self.bestAttemptContent);
}
didReceiveNotificationRequest方法在限定时间内没有调用 contentHandler方法结束处理,则会在过期之前进行回调本方法。此时你可以对你的 APNs 消息进行紧急处理后展示,如果没有处理,则显示原始 APNs 推送。libz.tbd
libsqlite3.tbd
GTExtensionSDK.xcframework
UserNotifications.framework

需设置 NotificationService 最低运行版本为 10.0:

NotificationService.m 文件中,导入 GtExtensionSdk 的头文件:#import <GTExtensionSDK/GeTuiExtSdk.h>
GeTuiExtSdk 头文件,如下:/**
* 统计APNs到达情况和多媒体推送支持,建议使用该方法接入
*/
+ (void)handelNotificationServiceRequest:(UNNotificationRequest *)request withAttachmentsComplete:(void (^)(NSArray* attachments, NSArray* errors))completeBlock;
/**
* sdk销毁,资源释放
*/
+ (void)destory;
接口使用说明:
1).如果需要多媒体推送,请使用第二种方法进行调用。接收到 APNs 通知后,SDK 判断是否有多媒体资源,如果多媒体资源存在则SDK下载资源,下载完成后以 Block 方式回调返回 attachments 资源数组对象和 errors 错误数组信息。
2).多媒体大小限制:
资源 类型 大小 超时 图片 1 <=10M 120s 音频 2 <=5M 60s 视频 3 <=50M 180s
3).可设置是否仅在 WIFI 下下载资源,参考服务端API。如果为True,数据网络环境下将不下载资源,展示通知不带附件。默认是:False,支持 WIFI 和数据网络下下载。
4). 资源URL格式注意:不支持中文及转译地址,请使用英文合法地址。
NotificationService.m中有两个回调方法 didReceiveNotificationRequest 和 serviceExtensionTimeWillExpire。需要在 didReceiveNotificationRequest 中添加 GtExtensionSdk 的推送回执统计处理,由于回执操作是异步请求,因此待展示推送的回调处理需要放到回执完成的回调中。示例代码如下:- (void)didReceiveNotificationRequest:(UNNotificationRequest *)request withContentHandler:(void (^)(UNNotificationContent * _Nonnull))contentHandler {
self.contentHandler = contentHandler;
self.bestAttemptContent = [request.content mutableCopy];
NSLog(@"----将APNs信息交由个推处理----");
[GeTuiExtSdk handelNotificationServiceRequest:request withAttachmentsComplete:^(NSArray *attachments, NSArray* errors) {
//注意:是否修改下发后的title内容以项目实际需求而定
//self.bestAttemptContent.title = [NSString stringWithFormat:@"%@ [需求而定]", self.bestAttemptContent.title];
self.bestAttemptContent.attachments = attachments; //设置通知中的多媒体附件
NSLog(@"个推处理APNs消息遇到错误:%@",errors); //如果APNs处理有错误,可以在这里查看相关错误详情
self.contentHandler(self.bestAttemptContent); //展示推送的回调处理需要放到个推回执完成的回调中
}];
}
ErrorCode 描述 解决 10001 多媒体地址错误,无法下载 请使用正常地址下发 10002 Http URL 不支持 支持 ATS 使用 Https 地址或者将 NotificationService 配置为支持 Http 请求,如下图所示 10003 多媒体资源超过大小限制 请检查多媒体资源大小是否符合,更正后重新下发
开启多媒体地址 Http 访问支持:

NotificationService 处理超时时,需调用 GtExtensionSdk 中 destory 方法,进行资源释放,防止因为资源未正常释放导致 crash。//NotificationService处理超时时系统调用
- (void)serviceExtensionTimeWillExpire {
//销毁SDK,释放资源
[GeTuiExtSdk destory];
//结束 NotificationService 调用
self.contentHandler(self.bestAttemptContent);
}
Generic iOS Device,然后再进行 Product -> Archive 操作。只有选择 Generic iOS Device 才能打包编译出带有 Notification Service Extension 且适配全机型设备的 IPA 包。如下图所示:
Apple 在 iOS 8 后引入了一个基于 PushKit 框架的 VoIP 推送,这可以使用户收到一个 VoIP 推送时唤醒 APP。有了这种 VoIP 的推送,开发者们不需要让 APP 持续保持后台运行。当 APP 在后台被系统挂起后如果需要 APP 后台运行,可以发送这个 VoIP 消息将会在后台唤醒 APP,并执行制定的代码 (在弹出通知消息给用户之前)。
VoIP 服务需系统 iOS8 及以上系统支持。
VoIP 证书不区分开发和生产环境,VoIP 证书只有一个,生产和开发都可用同一个证书。
警告:在iOS 13 之后 Apple不再允许PushKit应用在非Voip电话的场景下,如果需要使用Pushkit则需要接入Callkit的接口。若需要实现语音播报功能,建议通过通知扩展实现,具体参考官方Demo;
1、导入 PushKit.Framework 库以 Optional 方式引入。
2、导入头文件 #import <PushKit/PushKit.h>。
3、AppDelegate 实现 PKPushRegistryDelegate 协议,并实现 Delegate 中的接口。
<!--实现 PKPushRegistryDelegate 协议-->
@interface AppDelegate : UIResponder <UIApplicationDelegate, PKPushRegistryDelegate, GeTuiSdkDelegate> {
}

- (void)pushRegistry:(PKPushRegistry *)registry didUpdatePushCredentials:(PKPushCredentials *)credentials forType:(NSString *)type {
<!--具体实现参考 6.3 -->
}

- (void)pushRegistry:(PKPushRegistry *)registry didReceiveIncomingPushWithPayload:(PKPushPayload *)payload forType:(NSString *)type {
<!--具体实现参考 6.4 -->
}
在 info.plist 中添加 voip 权限,如图:

1、注册 VoIP
//注册 VoIP
- (void)voipRegistration {
    dispatch_queue_t mainQueue = dispatch_get_main_queue();
    PKPushRegistry *voipRegistry = [[PKPushRegistry alloc] initWithQueue:mainQueue];
    voipRegistry.delegate = self;
    voipRegistry.desiredPushTypes = [NSSet setWithObject:PKPushTypeVoIP];
}
didFinishLaunchingWithOptions 中调用 VoIP 注册- (BOOL)application:(UIApplication *)application didFinishLaunchingWithOptions:(NSDictionary *)launchOptions {
[GeTuiSdk runBackgroundEnable:YES]; // [是否允许APP后台运行]
[GeTuiSdk lbsLocationEnable:YES andUserVerify:YES]; // [是否运行电子围栏Lbs功能和是否SDK主动请求用户定位]
[GeTuiSdk setChannelId:@"GT-Channel"]; // 渠道
// [1]:使用APPID/APPKEY/APPSECRENT创建个推实例
[GeTuiSdk startSdkWithAppId:[AppConfig GtAppId] appKey:[AppConfig GtAppKey] appSecret:[AppConfig GtAppSecret] delegate:self launchingOptions:launchOptions];
// [2]:注册APNS
[self registerRemoteNotification];
// [3]:注册 VoIP
[self voipRegistration];
return YES;
}
2、绑定 VoIP Token
- (void)pushRegistry:(PKPushRegistry *)registry didUpdatePushCredentials:(PKPushCredentials *)credentials forType:(NSString *)type {
    //向个推服务器注册 VoipToken 为了方便开发者,建议使用新方法
    [GeTuiSdk registerVoipTokenCredentials:credentials.token];
}
- (void)pushRegistry:(PKPushRegistry *)registry didReceiveIncomingPushWithPayload:(PKPushPayload *)payload forType:(NSString *)type {
    // TODO:接收 VoIP 推送中的 Payload 信息进行业务处理。
    <!--TODO: 具体 VoIP 业务处理-->
    NSLog(@"[VoIP Payload]:%@,%@", payload, payload.dictionaryPayload);

    // 调用个推 VoIP 回执统计接口
    [GeTuiSdk handleVoipNotification:payload.dictionaryPayload];
}
GTSDK 2.7.0.0开始支持 Mac Catalyst。
卓信ID SDK是从GTSDK 2.6.6.0版本时默认集成。ZXSDK为个推Pod依赖库,即Pod集成GTSDK时将自动引入ZXSDK。
示例代码:
#import <ZXSDK/ZXSDK.h>
- (BOOL)application:(UIApplication *)application didFinishLaunchingWithOptions:(NSDictionary *)launchOptions {

    // 设置是否提示权限弹窗; YES:提示(默认) NO:不提示
    [ZXSDK allowPermissionDialog:NO];
    [ZXSDK startZXSDK];

    [ZXSDK getZXID:^(ZXSDKResultModel * _Nullable model, NSError * _Nullable error) {
        NSLog(@"getZXID ID:%@ 失效时间:%@ error:%@", model.zxid, model.expireTime, error);
    }];
    return YES;
}
具体用法可以参考:卓信ID文档。
iOS 16.1 中推出了一个新功能 LiveActivity(实时活动)。具体可参考Activitykit官方文档。
主工程使用ActivityKit 框架控制实时活动的生命周期。Widget Extension 中开启Live Activity,进行实时活动的业务、界面处理。
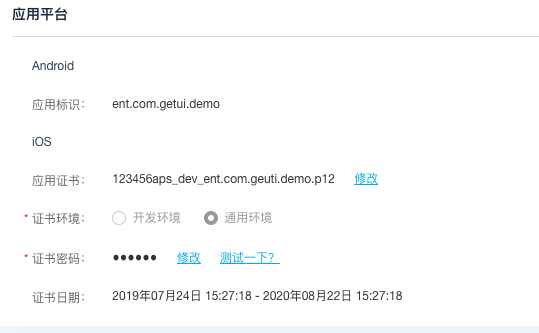
实时活动支持远程推送进行更新。不支持p12证书,请用户配置p8证书。
1、导入 ActivityKit.Framework 库以 Optional 方式引入。
2、ActivityKit.Framework 仅支持 Swift , Objective-C 工程可通过桥接使用。
3、在主工程的 Info.plist 文件中添加一个键值对,key 为 NSSupportsLiveActivities,value 为 YES;
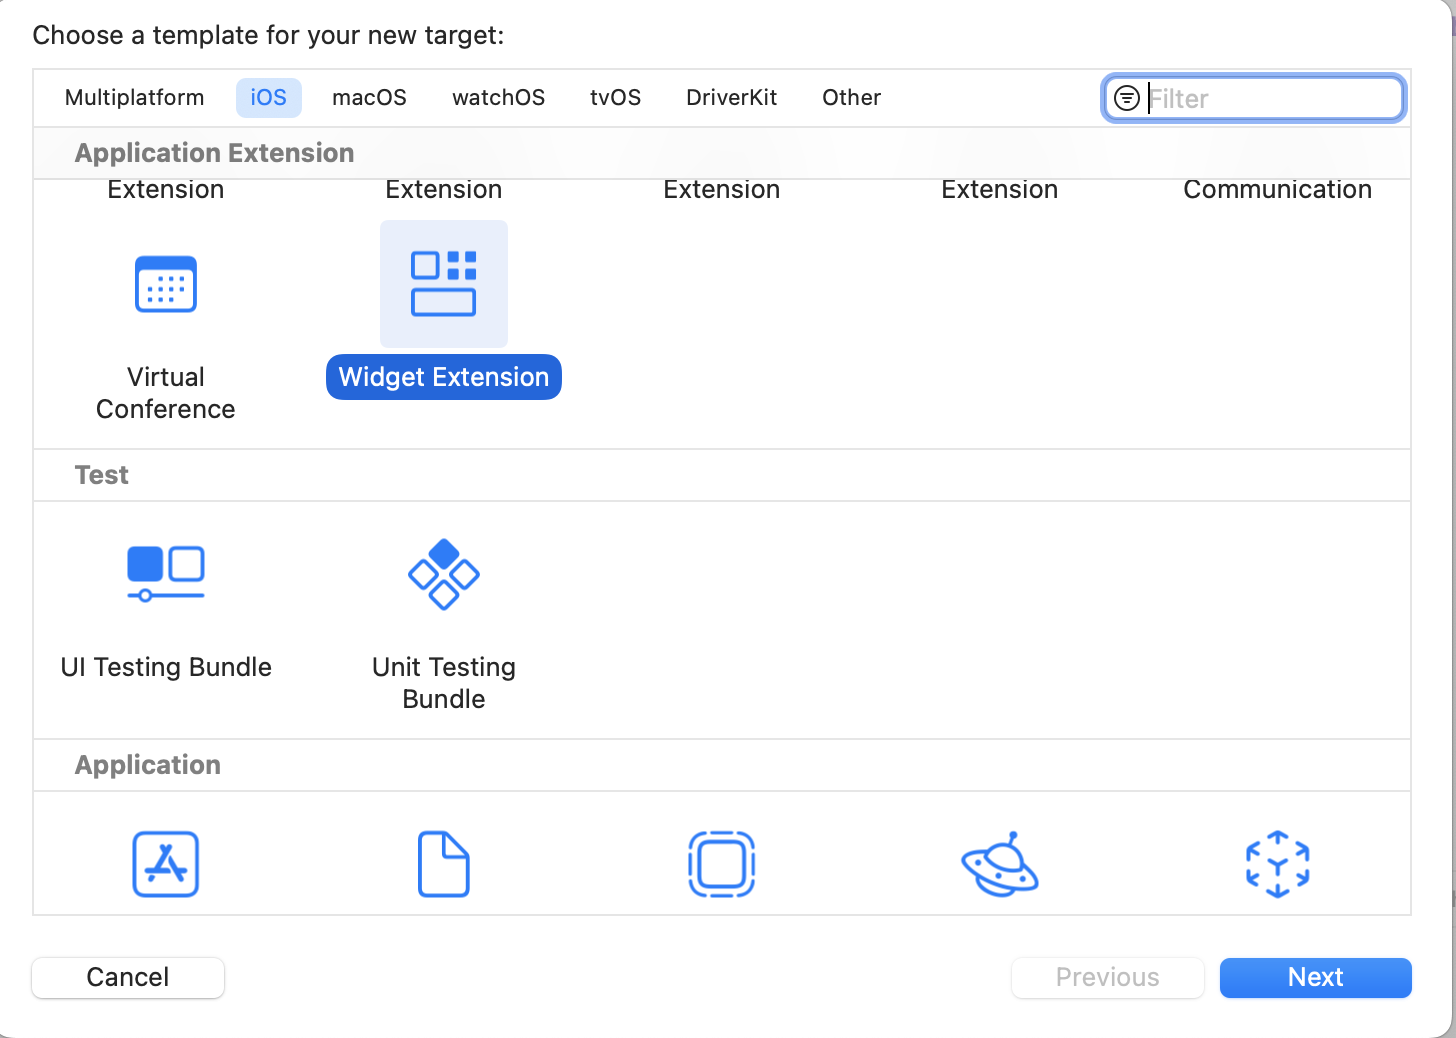
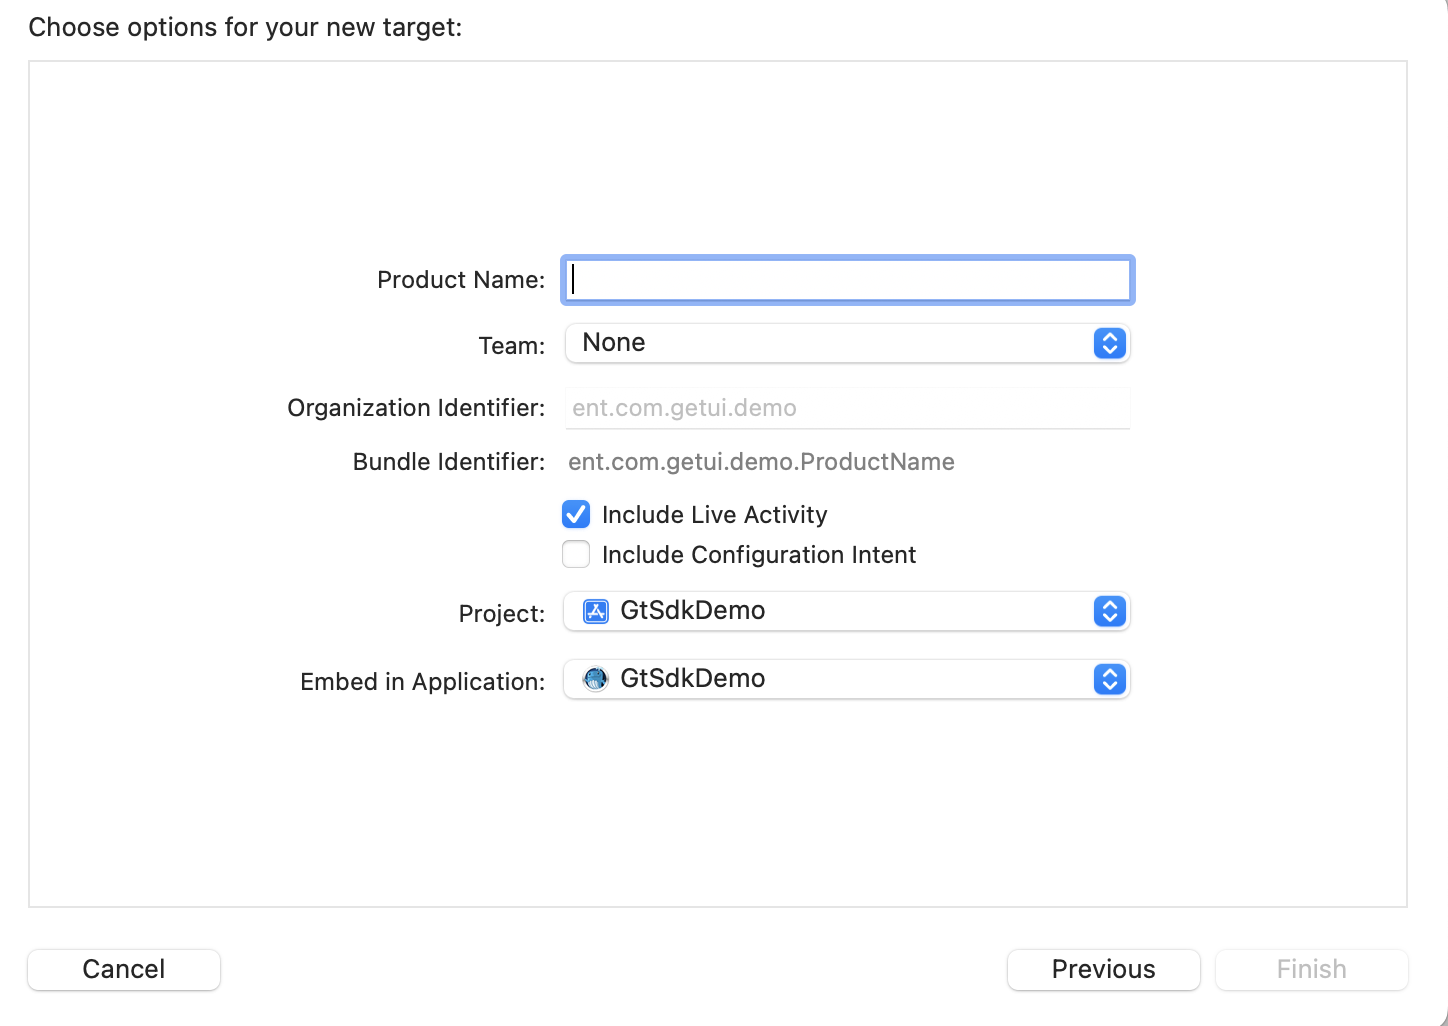
可参考 Apple 官方文档,或参考个推官方 Demo ,熟悉实时活动远程推送,并在工程中进行开发。
开启实时活动成功后,通过 pushTokenUpdates 方法可拿到 PushToken 。需要通过个推SDK提供的方法,上传 PushToken ,以支持实时活动推送。
//示例代码
Task {
    for await updates in Activity<Attributes>.activityUpdates {
        NSLog("Activity \(Attributes.self) list update count: \(Activity<Attributes>.activities.count)")
        NSLog("Activity \(Attributes.self) list update new:\(updates.id)")

        Task {
            let id: String = updates.id
            var la_id: String = ""
            if let activity = updates as? Activity<MyWidgetAttributes> {
                la_id = activity.attributes.name
            }
            for await tokenData in updates.pushTokenUpdates {
                //监听token更新
                let mytoken = tokenData.map { String(format: "%02x", $0) }.joined()
                NSLog("Activity \(Attributes.self) list update token=\(mytoken) id:\(updates.id) ")

                //TODO: 开发者上传PushToken
                GeTuiSdk.registerLiveActivity(la_id, activityToken: mytoken, sequenceNum: id)
            }
        }
    }
}
pushToStartToken 方法可拿到 token 。需要通过个推SDK提供的方法,上传 StartToken ,以支持实时活动推送。//示例代码
if #available(iOS 17.2, *) {
let tokenData = Activity<Attributes>.pushToStartToken
if let token = tokenData {
//获取当前
let pushToStartToken = String(data: token, encoding: .utf8)
let attributeName = "\(Attributes.self)"
NSLog("Activity \(Attributes.self) pushToStartToken = \(String(describing: pushToStartToken))")
//TODO: 开发者上传pushToStartToken
GeTuiSdk.registerLiveActivity(attributeName, pushToStartToken: pushToStartToken ?? "", sequenceNum: attributeName)
}
Task {
for await tokenData in Activity<Attributes>.pushToStartTokenUpdates {
//监听token更新
let mytoken = tokenData.map { String(format: "%02x", $0) }.joined()
let attributeName = "\(Attributes.self)"
NSLog("Activity updates \(Attributes.self) pushToStartToken = \(mytoken) ")
//TODO: 开发者上传pushToStartToken
GeTuiSdk.registerLiveActivity(attributeName, pushToStartToken: pushToStartToken ?? "", sequenceNum: attributeName)
}
}
}
个推SDK 3.0.5.0开始支持隐私文件和SDK签名。GTCommonSDK 3.1.0.0开始支持隐私文件和SDK签名。
下载SDK,解压后查看PrivacyInfo.xcprivacy文件。
GETUI_IOS_SDK/
  |- Lib/
  |    |- GtSdkLib/ (标准版个推SDK.xcframework文件)
  |    |   |- GTExtensionSDK.xcframework
  |    |   |    |- ios-对应cpu架构
  |    |   |    |   |- GTExtensionSDK.framework
  |    |   |    |   |   |- PrivacyInfo.xcprivacy
  |    |   |- GTSDK.xcframework
  |    |   |    |- ios-对应cpu架构
  |    |   |    |   |- GTSDK.framework
  |    |   |    |   |   |- PrivacyInfo.xcprivacy
  |    |   |- GTCommonSDK.xcframework  (个推SDK 3.0.0.0及以上版本提供)
  |    |   |    |- ios-对应cpu架构
  |    |   |    |   |- GTCommonSDK.framework
  |    |   |    |   |   |- PrivacyInfo.xcprivacy
以上文档对您是否有帮助?